For many dog owners, nail trimming ranks high on the list of dreaded tasks. Traditional clippers can cause anxiety, accidental cuts, and splintered nails. Enter the pet nail grinder—a game-changer for safe, painless grooming. When used correctly, it files nails down smoothly without the risk of cutting the quick. This guide walks you through the exact process, turning a stressful chore into a bonding experience.

Why Grinding Beats Clipping: The Science Behind the Tool
Nail grinders use a rotating sanding surface to gently file nails instead of cutting them. This method offers critical advantages:
- •No Painful Nicks: Eliminates the risk of cutting the quick (the blood vessel inside the nail) .
- •Smoother Edges: Prevents sharp splits that can snag carpets or scratch skin .
- •Reduced Anxiety: Quiet motors (especially under 40 dB) minimize stress for noise-sensitive pets .
- •Precision Control: Lets you remove layers gradually, ideal for dark nails where the quick is invisible .
Pre-Session Prep: Setting Up for Success
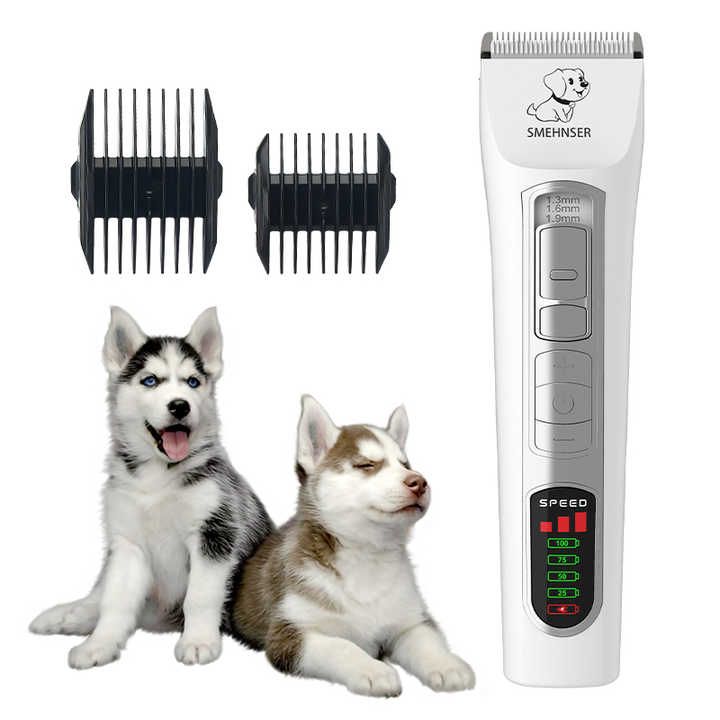
1. Choose the Right Grinder
Not all tools are created equal. Prioritize these features:
- •Variable Speed Settings: Start slow (for anxious dogs) and increase as needed .
- •Safety Guard: Prevents fur entanglement and over-grinding .
- •Multiple Grits: Coarse grit for thick nails, fine for finishing .
- •Low Vibration & Noise: Critical for keeping pets calm .
Pro Tip: Test the grinder on a pencil first—it should file smoothly without jerking or overheating.
2. Prepare Your Dog
- •Desensitize Early: Let your dog sniff the offgrinder for 2–3 days. Reward with treats .
- •Paw Handling Practice: Gently touch their paws daily, rewarding cooperation .
- •Trim When Relaxed: Post-walk or after a meal is ideal. Avoid forcing a tired or hyper dog .
3. Set Up Your Workspace
- •Lighting: Use a bright lamp to see the quick clearly (especially for black nails) .
- •Non-Slip Surface: Place a rubber mat on your table to prevent slipping .
- •Distractions Ready: Have treats, a lick mat, or a second person to soothe your dog .
The Step-by-Step Grinding Process: A Stress-Free Approach
Step 1: Position Your Dog Correctly
- •Small Dogs: Hold them in your lap, securing their body against yours.
- •Large Dogs: Have them sit or lie on their side on a stable surface .
- •Key Move: Hold the paw from below, cradling it like a tennis ball. This prevents pulling away .
Step 2: Isolate the Nail & Find the Quick
- •Push fur away from the nail base to avoid snagging .
- •For White Nails: The quick appears pink—stop grinding 2mm before it.
- •For Black Nails: Grind in 1–2 second bursts, checking for a pale gray dot at the nail’s tip. This signals you’re near the quick .
Step 3: Grind Like a Pro
- 1.Start Slow: Turn the grinder on low speed. Let your dog acclimate to the sound .
- 2.Angle Matters: Hold the grinder at 45 degrees to the nail. Rest the guard against the paw pad for stability .
- 3.Grind in Circles: Use light pressure and move the grinder in small circular motions across the nail tip .
- 4.Work in Layers: Grind for 2–3 seconds per nail, then pause to check for heat. Overheating causes pain! .
- 5.Smooth the Edges: After shortening, lightly file the nail’s sides to prevent sharpness .
Critical Safety Note: Never grind continuously for >3 seconds—friction burns the quick. Touch the nail after each burst. If warm, pause immediately
.
Step 4: Troubleshoot Common Issues
- •Pulling Away: Stop and reward calm behavior. Try covering their eyes with your hand .
- •Overheating: Switch to a finer grit band or lower the speed .
- •Hitting the Quick: Apply styptic powder if bleeding occurs. Stay calm—your dog will mirror your energy .
Post-Grinding Care & Maintenance
- •Paw Check: Wipe paws with a damp cloth to remove dust. Check for cracks or redness .
- •Grinder Cleaning: Use a dry brush to clear debris from the grinding head. Never submerge in water! .
- •Reward Generously: End with high-value treats or playtime to build positive associations .
Pro Tips for Anxious Dogs
- •The “Two-Person” Method: One person comforts while the other grinds .
- •Noise Masking: Play calming music or use a white noise machine .
- •Short Sessions: Only do 2–3 nails per day until your dog builds tolerance .
How Often Should You Grind?
- •Active Dogs: Every 6 weeks (concrete naturally files nails).
- •Senior/Pets: Every 3–4 weeks to prevent overgrowth and joint strain .
Final Checklist for Perfect Grinding Sessions
✅ Grinder prep: Fully charged, clean head, safety guard attached.
✅ Dog prep: Calm, paws pre-handled, high-value treats ready.
✅ Technique: 45° angle, 2-second bursts, circular motions.
✅ Aftercare: Paws cleaned, dog rewarded, tool maintained.
Grinding your dog’s nails doesn’t need to be a battle. With the right approach, it becomes a quick, safe ritual that keeps your dog’s paws healthy—and your floors scratch-free. Patience and consistency are your greatest tools. Start slow, celebrate small wins, and in time, even the most nervous pup will learn to tolerate (or even enjoy!) the process.
“The gentle hum of the grinder is now my dog’s cue for treats—he actually falls asleep during sessions!”
—Verified user review of the Rojeco N8 Grinder